Happy Halloween everyone! In this season of ghostly apparitions and things going bump in the night, here are a few Q and A's on chasing away bicycle gremlins. And, remember to save any Snickers bars you get while trick or treatin' - great ride food!
Q: Hi Jim,
Bike noises can be such puzzlers, so I was happy to find your webpage on them. I could relate to many of the noises. Here's one that had me stumped (still does, insofar as the exact mechanism goes).
I have a Gary Fisher HiFi-Plus mountain bike. I ride a lot and stay on top of general cleanup, as Boise's summer trails are dusty. After a couple of years,
it developed a slight "click" or "tick" on most crank revolutions. Came from the bottom bracket/crank area. You could hear it but not feel it. I kept riding. With time, the single click grew to a couple of clicks - again, fairly regular with revolutions. With more time, these clicks merged into a close-spaced series that I would call a "c-r-r-r-reak". Almost the sound of something flexing. Usually took 10-15 minutes of riding to really develop. Of course, such stuff resonates through the whole frame and is annoying no end.
As this developed over a month's time, I suspected and tried everything - pedals, cranks, chainrings, chain, bearing bracket, frame cracks, etc. Check, tighten, clean, lube. Nothing helped. Other mechanic friends suggested everything I had already tried. Having admitted defeat, I dropped by the shop I bought the bike from, recounted the history, told them I wasn't going to give them the bike to puzzle over (I was going to fix this myself!), but had they ever run into this on this bike?
Almost without hesitation, the mechanic told me to to just disassemble the bottom bracket, clean it up, and put it back together. I protested, saying that I knew it was in/torqued to specs, etc. He said, "Trust me." I did.
Complete tear-down, wipe-down, lube and reassemble. Voila - no creak. Not for 2 years now. My explanation: somehow fine grit or something works its way into those fine threads, or the metal-to-metal/metal-to-plastic contact of bearing/bracket parts (or something) gets to where parts move against each other ever so slightly, generating the sound in the flexing or twisting. What do you think?
Eric
 |
| Teflon tape can silence BB clicks and ticks |
A: I’m glad your mechanic was able to give you such a sure fix, Eric. In a lot of cases I’ve seen, it
is the BB – not always – but so frequently, that it never hurts to take out and reinstall the BB. On most cranksets these days it’s relatively simple to do this if you have a few basic tools, like
Park Tool's BBT-9
cup tool for Shimano BBs. It used to be a much bigger job to do it right, but then BBs didn’t used to make noise so often either. Maybe it’s a trade off we all have to make to enjoy cartridge bearing, oversize, external cup BBs?
The bike I ride the most is a
Litespeed Vortex road bike. It has an aluminum BB in a titanium frame. This combination tends to eventually creak, click, etc. A trick that works is wrapping plumber's Teflon tape around the BB cup threads during installation. This adds a layer of plastic in there and seems to give you several years before any noise returns. In fact,
Jeff Pierce, the 3rd American to win a Tour de France stage (on his Litespeed Vortex), told me the mechanics used plumber's tape on the team bikes.
And, I think you’re right, that the parts in the BB are slightly loosening and that dirt/grit is getting in there and causing the noise. You might experiment with plumbers tape or a thicker lube, maybe an anti seize, or a Locktite even, to see if you could get a longer lasting seal that prevents the noise almost permanently.
It’s fun figuring this stuff out – if the noise doesn’t drive you crazy first!
Jim
----------------------------------------------------
Q: Hi Jim,
I saw that you ride a
Cervelo Soloist just like me, so I thought you'd be a good person to ask. This seems like it should be a simple question but... I've been asking around about
how to tell if a 12-25 cassette should be replaced?
I need to replace my chain. If I don't replace the cassette at the same time, and it's bad, I run the risk of ruining the chain prematurely. If I replace the cassette and it's not bad, I'm just throwing out a good cassette (which happens to be a Shimano Ultegra model).
So, if I can know the signs of a bad cassette, I'm golden. Problem is, every bike shop I talk with tells me there is no way to really tell, and that I'm better off replacing the cassette. That's OK if you have deep pockets. I thought of comparing a new cassette directly with the old one, but is this really the only way?
Any suggestions you offer up will be greatly appreciated,
Bruce
A: What the shops are telling you is pretty accurate, Bruce, but there actually is a cassette-cog checking tool made by the German chain/hub company Rohloff, but I’ve never had a chance to try it – or even seen it anywhere. You can learn more about its use on their
pdf instructions page and check out the illustration on the right.
Here’s the page on it on their site.
It might be an interesting and helpful tool. I’m not sure having never used it, but I'll try to purchase one and give it a try.
Unfortunately, you can’t know if a cassette is worn out without checking it somehow. The changes to the cogs over time are so slight that you can't see the wear the way you can with the chainrings, which are made of aluminum and change shape more distinctly. But, it’s foolish to pay for a new cassette if your old one isn’t worn out. Also, unless it’s truly worn out, a cassette won’t hurt the new chain.
The standard way to check for cassette cog wear is to install the new chain (when the old one needs replacing), and then go for a test ride. While riding, you shift onto each cog, one at a time. On each cog, you stand up and push hard to feel if the chain runs smoothly and more importantly if it skips. Skipping makes a loud popping noise and you’ll almost crash if you’re not careful as the chain actually rides up and off the cog and skips forward. If you experience this, you know that the cog(s) that skip are worn out and the cassette needs to be replaced.
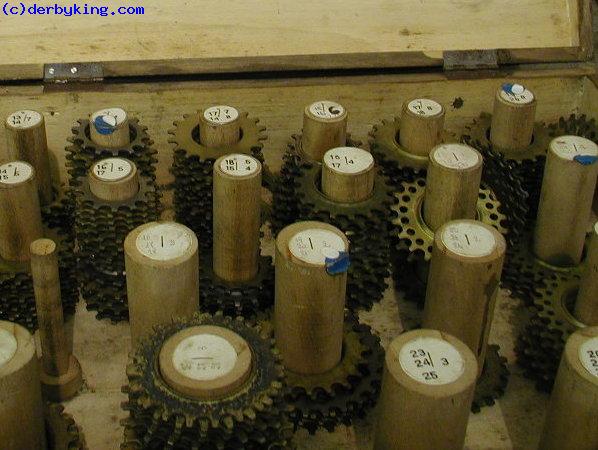
In the days of freewheels we could replace one cog at a time. Typically, you’d replace only the cogs that skipped and they’d usually be the smallest cogs. So, you’d put on a new 12 and 13 and the cassette would be good to go. Here's a
photo of a classic Regina freewheel cog case that we used to use to build and repair Regina freewheels in the 70's and 80's.
With the advent of cassettes, though, you now have to buy the whole thing, which is a shame because you never wear out all the cogs at the same rate so you’re paying for everything when you only probably need one new cog.
You can keep a cassette lasting longer by changing the chain more frequently, but you end up paying for the chains, so you have to do the math for yourself and decide what makes the most sense. If you prefer expensive chains, you probably want to get your money's worth out of them.
Most of us just ride the chain until it’s
showing signs of wear and then we replace it. Usually the cassette won’t be worn out yet. But, after you’ve replaced 2 chains, you may need a new cassette. It depends a lot of how and where you ride. So, if you’re in the rain and climbing hills all the time, you will wear things out faster than a flatlander in dry conditions.
If you decide to buy the Rohloff tool, I’d enjoy hearing how you like it and if it’s useful. I didn’t study the instructions sheet, but maybe you could even make your own version somehow as a do-it-yourself project? Though it may be easier to just test ride your bike with the new chain to see if the cassette is worn out yet.
Jim
----------------------------------------------------
Q: Hello from Bucharest, Romania, Jim!
I found you by searching on Internet about
bicycle noises, read it with great interest. Thank you for posting that info!
I just want to tell you about a strange noise which comes from my bike and drives me nuts. Maybe you met that before and I would be happy if sharing some info.
Shortly, while riding in sitting position with every pedal revolution
I hear a noise coming from the upper tube of the frame. Sounds like metal crack. And the weird thing: when I loosened and then tightened the seat binder bolt the noise disappears for a while (let's say like 10-15 km of riding) and then reappears.
I already spray lubed it, installed it back, and it did nothing. The noise also appears if staying only in sitting position and moving back and forth without pedaling, but when I lean forward my upper body it starts to disappears. It seems to me like a sort of tension is creating over time between seat post and frame.
I'll let you know in case I found a solution and maybe you'll find it useful to put it on your website.
I'll be glad to help out other cyclists.
In case you have any suggestion please let me know, I would highly appreciate!
Regards,
Lucian
A: Nice to hear from you, Lucian, but sorry to hear about the noise on your Scott Scale 50 bicycle. Have you tried using a semi-permanent grease on the surface of the seatpost, inside the clamp around the frame and on the bolt too? There’s something called
anti-seize
. It’s a kind of lubricant designed to not evaporate or wear off. The kind I have is silver. If you get it on your hands, it’s hard to get off because it’s sticks so well.
If you can find this stuff, and apply it to those parts, it might make the noise go away forever. I would also take the time to disassemble the seat clamp at the top of the seatpost – the part that clamps the seat. Then lube those parts and put it back together. That’s an area where these noises come from too, and if the seatpost was not lubed already, they may have forgotten to lube the seatpost clamp/seat interface too.
These steps should quiet your bicycle!
Jim
----------------------------------------------------
Q: Hello Jim,

Here I am again with a problem facing to. I took apart my Shimano Nexus

internal-gear hub, because it started to have some sandy noise from it (suspected that some dirt penetrated under the sealing). Took off the whole gear set from the hub as one, washed in petrol, put some grease on it and installed back.
Even though it seems everything in the right place,
in gears 3-7 and when using the pedal brake, it has an awful cracking noise. Any hints what did I do wrong? I used white vaseline from the pharmacy as grease, can it be the mistake?
Thanks,
Béla
A: Hi Béla,
I suspect that when you washed it with petrol you removed all the lubrication. Petrol is too harsh for cleaning bicycle parts like hub gears. It's so powerful it cuts through and ruins any lubricants inside and you end up with a part that's dry and no longer lubricated. This puts metal parts that touch each other and need to mesh correctly in jeopardy because they are now running metal on metal with no film of lube between them.
Lubing it with Vaseline wouldn't likely solve the problem. The petrol gets inside the parts and washes out all the lube. The Vaseline - even if you spread it and push it - will have a hard time getting between parts and lubricating them adequately.
What I would try is taking it apart again and lubricating it with a thick oil, like automobile motor oil. You need to get this inside the parts. Be sure not to get it on any parts in the brake that are required to provide friction for stopping. But, get it inside the moving parts that mesh for shifting/gearing. One approach would be to soak the parts in an oil bath for a while so the oil really penetrates. Then, you'd want to let it drain out and wipe the outside of the part clean. Oil will leak out in use later, but you can use a rag to wipe it off. And, you know the part is lubed inside.
In the future for cleaning you can use a thin oil. This will wash out dirt while keeping the lube intact inside the parts. You never want to remove all the lube because it's hard to get it back in there. That's why it's a problem to clean parts with petrol or engine-cleaner solvents.
You should us a good bicycle grease on any hub bearings. Vaseline is too thin to last long enough.
I hope this helps get the hub running nicely again,
Jim