Saturday, December 27, 2014

New resource: 1991-1999 Bicycle Specifications Archive

Just in time for a new year, I'm pleased to announce a handy resource for buyers of used road and mountain bicycles or those needing information to keep one on the road or dirt. It's Anthony ("Tony") Alsberg's collection of bicycle specifications.

From 1991 until 1999, in our Bicycling Magazine West Coast Editorial Office (which was located in Soquel, California - photo), Tony disassembled, weighed, reassembled and recorded the specifications (specs) for over 100 road and mountain bicycles we were testing and reviewing in our pages.

Many of these bicycles are from famous brands still around today. But, others are from companies now out of business, like Bridgestone bicycles. So, these specs can be helpful for finding how the bike was originally equipped and for learning more about the bike design. Also, if you're restoring a classic old bike, having the original specs is a huge help in finding the correct replacement parts.

For each specifications sheet, there is an accompanying road test and photograph(s) in my library somewhere. All I have to do is find it!

Enjoy these specs from the 90's,
Jim

Wednesday, December 10, 2014

Jim's Last-Minute Cycling Gift Guide

Happy Holidays and happy the-time-of-year-no-one-knows-what-to-get-for-their-favorite-cyclist (which might be YOU!).

Here are a few sure-to-please cycling gift suggestions - well, if you count my last tip, it's more like many thousands of bike gift ideas, so keep reading! (And be sure to share this, so that you get the gift you really want!)

Your Home Bicycle Workshop e-Book ($19.95)
Let's start with a suggestion dear to my heart: my very own Your Home Bicycle Workshop e-book. It's the only book of any type all about setting up the perfect place for your loved one to work on all your bicycles. And you can download it right away so it's the ideal last-minute gift. It's in the RoadBikeRider e-bookstore where you'll find many other great cycling reading gifts available right now.

Bicycle Quarterly Classic Bicycles Calendar 2015 ($15)
Every year about this time I start searching local bookshops for a nice, new bicycle theme calendar for my office wall, and to give as a gift. But, I almost never find anything. So, I was happy to discover the magazine Bicycle Quarterly’s Classic Bicycles Calendar, that features 12 studio-quality photos of famous road bikes and a short history about each one, too. They'll also love receiving Bicycle Quarterly magazine next year ($36 for a year's subscription in the USA).

Pedro’s Super Prestige floor pump ($65)
All roadies need a good floor pump because it’s the one essential tool for keeping tires fully inflated so that they always enjoy great rides. But I’ve found that lots of riders use their pump for so long that it barely works anymore. If your loved one has been using the same pump for eons like this, they will be delighted to receive a huge upgrade in the form of Pedro’s Super Prestige. Its best trick is being able to grip Presta and Schrader valves every time with an airtight seal and without having to change the pump’s head in any way. It’s also easy to pump, has a nice and very visible gauge, a long hose and is built to last.

Boa Closure Cycling Shoes ($varies)
This gift idea is for a somewhat-new technology that many road riders love when they try it: shoes with Boa Closures. It’s a system that uses tough, thin wire/filament laces that you tighten and loosen with a ratcheting dial. This allows fine-tuning the fit along the entire length of the shoes simply by turning the dials. And the result is even more comfortable shoes and power transfer. To buy this gift, you’ll want to give them a gift certificate to a bike shop that carries shoes with Boa Closures so that they can get the right fit and features. Here's a page showing the many shoe brands using Boa Closures.

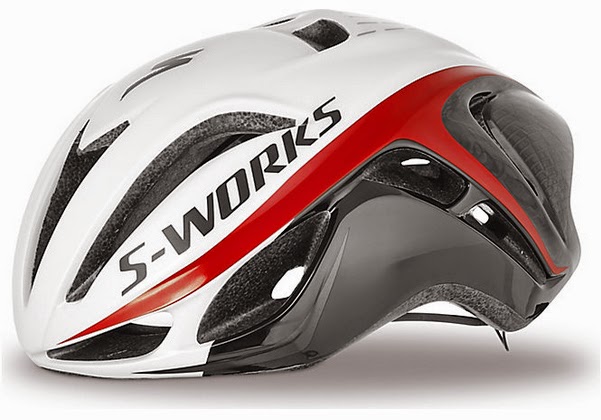
Specialized S-Works Evade road aero helmet ($250)
A new helmet is always a great gift because with use, helmets become less effective. And new helmets continue to improve offering more protection and comfort. Plus, in the case of Specialized’s S-Works Evade, you’re actually also giving them the gift of free speed because it’s a wind-cheating aero helmet proven to reduce drag and save them energy on every ride. There are other companies making road aero helmets, too, such as Giro's new Synthe ($250).

Keep On Kovers for Speedplay pedals ($16 to $20)
Keep On Kovers make a great stocking stuffer for anyone riding Speedplay road pedals (look for lollipop-looking pedals on your giftee’s bike). They’re rubber cleat covers with a great trick: they go on and stay on (unlike all the others that you have to put on and take off every time you stop/start)! These covers don’t interfere with pedal entry/exit one bit and they fully protect their Speedplay cleats and even keep the screws in should they loosen. Even better, they won't lose them or forget to bring them along on rides because they stay on their shoes!

Bike Mechanic Tales from the Road and the Workshop ($24.95)
I just received this new book from VeloPress and I’m reading it every chance I get because it immediately jumps you behind the scenes of professional racing and puts you in the team car and pits with the mechanics. These are the overworked guys in charge of keeping everything running, from the bikes, to the cars and trucks, to organizing the pits, to even helping dress their riders and care for them during races. If they have any interest in the nuts and bolts at the pro level of our sport I’m sure they’ll be as taken with this book as I am. The many photos alone are worth the price of admission.

Camelbak Podium bottle ($10 for 24 ounce)
Every roadie needs new, clean and high quality bottles, so you can’t go wrong gifting them a Camelbak Podium bottle or two. They’re so easy to drink from and leak-free and tasteless, that they’ve become my favorites. They’re also available in different sizes and insulated versions, some with custom graphics, too, so you can get whatever you think best matches their bicycle or kit. This is an inexpensive gift with high value to your rider.

Grease Monkey Wipes ($9 to $20)
A clean bike is a happy bike - and rider! You can make it super easy for them to keep their baby showroom clean by gifting them a supply of Grease Monkey Wipes. These handy towelettes are saturated with a citrus cleaner so they simply wipe to clean their frame and components - even greasy drivetrain parts. They’ll be as amazed as I was how much easier these make bike cleaning. They come in the handy packets shown (easy to take along on rides) or in canisters, too.

Etsy cycling gifts (all price ranges)
Type "bicycle" in the hand-made gift resource/community Etsy and you'll bring up tens of thousands of ideas. That's how I found BryansRebicycling's Silver Infinity Spoke Bracelet shown, a super-cool recycled bike-part gift idea, and hand made, too, for only $14.98 plus shipping! But there are almost endless other choices, so happy searching and shopping!

Velo Orange Porteur Rack ($165)
This beautiful front rack has been out of stock on the Velo Orange site for some time, however, it's such a nice porteur rack - a type kind of hard to find - that you might want to give a gift certificate for it and just let them wait for the shipment to arrive. Porteur racks have a wider platform than standard ones, so they're ideal for city bikes that carry larger loads (French newspaper deliverers used these racks). Velo Orange's is made of polished stainless steel so it adds class along with versatility to your around-town ride. The rail is removable.

Last, but not least, in case you're wondering what I want for Christmas. It's this P&K Lie Special250 Truing Stand. Might as well dream big, right?

Here's hoping you have wonderful holiday,
Jim (aka Santa)

Friday, October 3, 2014

PRODUCT REVIEW: Giro's 2014 Air Attack Shield Helmet

Every time I wear it, riders are still asking about my helmet so I thought it would be helpful to rerun this review that ran earlier this year on RoadBikerider.

There's a Giro video about their development of this new helmet at the end 
Good rides!
Jim

An Every-Ride Aero Helmet For Roadies

I received this Giro Air Attack Shield (about $200, 360 grams) last winter (2014) and liked it so much right out of the box, that I was tempted to give it a great review after only a few rides and races.

However, it was mostly chilly back then and I wanted to see how it handled the heat. Last week, I finally got my chance when we hit 100 degrees, a record high for us, and perfect for helmet testing.

It was important to hammer in the heat in the Air Attack because its unique design includes a fuller-coverage body, only 6 narrow vents (you can barely get a finger in to scratch your head) and a full wraparound faceshield (there are three slit vents in the faceshield, too).

I suffered a minor concussion crashing and hitting my head hard while wearing an ultralight helmet not too long ago. So, I like how the Air Attack covers more of the head and its seemingly fuller and tougher In-Mold polycarbonate shell that resembles a BMX-type lid rather than a road-racing model (I say ‘seemingly’ because I haven’t crashed to test this - and hope not to!). It does feel stronger on your head though.

Full, crystal-clear faceshield 
The other obvious difference of the Air Attack is its full, wraparound faceshield. This polycarbonate, tinted lens attaches to the helmet via three powerful magnets, which means you can quickly and easily remove, invert and reattach the faceshield upside-down to expose your full face to the wind.

I haven’t had this happen, but it’s possible to drop the faceshield if you fumble while removing and replacing it. That wouldn’t be good for it, however, the magnets are so strong, that even if you only get it close to the helmet, they’ll grab and hold the faceshield tightly and it won’t drop.

The faceshield is tinted just the correct amount for my vision. It features Carl Zeiss optics for exceptional clarity and I’ve experienced no distortion or eye fatigue. I also find it to be exactly the right shape for full protection whether I’m sitting upright or in a full tuck. There’s a nose protector built in, however, it doesn’t come close to touching.

Most impressive, and among my favorite features of this helmet, is that the faceshield provides excellent protection and coverage and is also far enough from your face that you rarely get sweat on it. This means it doesn’t become blurry forcing you to have to clean it on rides the way glasses do. In fact, so far, I have only had to clean the faceshield about weekly.

It’s also great not having glasses resting on your nose and ears and not having to deal with fogging issues. Or having to put the glasses somewhere safe when they’re not working. I’ve damaged or lost many expensive pairs of glasses that way. 

Handling the heat 
On one of those hot days last week, I pushed hard for three 20-minute repeats up a sun-baked climb to see if I would overheat in the Air Attack. I felt warmer than in my standard Giro and Specialized helmets, but I didn’t have any overheating worries after the hour’s worth of intervals.

I credit Giro’s Roc Loc Air system and airflow design. Even though the helmet isn’t riddled with large vents, and even with the full faceshield, you feel air coming through the helmet and over your head at climbing speeds (a lot more on descents).

It’s because the harness holds the helmet slightly above your head. A dial in the back and sliding mechanism let you both tighten and raise/lower the harness for a custom fit.

Also, there are large exhaust ports in the back of the helmet and channels built into the inside that suck air through to help keep you cool and dry. Complementing the fine fit and venting are Giro’s antimicrobial and moisture-transferring X-Static comfort pads (removable for washing) and soft straps and Slimline buckles that you barely feel against your face.

The Air Attack fits me fabulously and I bet you’ll agree if you try one on.

Aero advantages
I was most interested in trying out the Air Attack’s full faceshield and having what might be a tougher lid. But, on my first rides with friends, someone asked me why I was wearing an aero helmet. Ditto, when I wore it during my first race this year, the Madera Stage Race. 

This caught me a little by surprise, because the Air Attack is hardly an aero helmet when you compare it to my rocket-ship-shaped time trial lids. It’s round and blunt and those are so long and pointy they look ridiculous. But those helmets are among the fastest things you can add to your time trial setup, so they’re essential.

Since everyone thought I was cheating the wind, I started paying attention to downhill coasting speeds and air noise (the quieter the helmet, the less wind resistance, in my experience). And low and behold, I started seeing higher speeds in my Strava PRs and on my computer. And the helmet was quieter at high speed, too.


That’s another excellent reason for wearing the Air Attack. By cheating the wind and making you faster, it’s also saving you energy, which is a great thing. And, if you’ve already upgraded to an aero road bike, this helmet is the icing on the cake.

Giro’s Air Attack Shield has a unique look, is slightly heavier and is warmer in really hot weather. It’s also sure to attract attention on rides. This all means that it’s probably not the right lid for all roadies. Yet, if you want a super-comfortable helmet that helps you ride and lets you ditch your eyewear, plus could provide more protection, you might love it just as much as I do.

The Air Attack Shield comes in sizes Small/Medium/Large (51-55/55-59/9-63cm) and colors Black/Red, Black/Silver, Blue/White (shown), Fluorescent Orange/White Matte Black and White/Silver.

Thursday, March 20, 2014

BIKE RESTORATIONS: Making a René Herse-style decaleur

Before brazing
To share this fun little project for the René Herse randonneuse I'm refurbishing, and to say thanks to my good friend and framesmith Paul Sadoff of Rock Lobster Cycles who brazed it for me, here are a couple of photos of my just-completed homegrown Herse-style decaleur (quick-release handlebar-bag holder).

If you visit this page of the website with the best archive of Herse bicycle photographs, and if you look closely at how the handlebar bag attaches to the stem, you can see an original. There's also an illustration below that shows how cleverly it works.

If you are looking for a modern version, you should visit this page on Compass Bicycles to see their decaleurs, which are Japanese-made and beautiful quality.

My bicycle was missing this crowning touch for the front of the bike. I purchased the Compass Bicycle version and it worked great. But then I saw the photo I linked to above, of the genuine Herse decaleur and I couldn't stop thinking about it and decided I had to have one like it on my bike. A couple of months later I have one.

To explain how it attaches to the bicycle, It mounts beneath the custom Herse stem on its twin bolts. You can just see the holes in the second photo. They're covered by masking tape in the first photo.

I'll somehow mark it so no one thinks it's an original piece, probably by etching some text beneath the plate that mounts to the stem bolts. I may use a vibrating writing-on-metal tool. Or, maybe I'll just write beneath the flat piece with a Sharpie and make it easy!

After brazing
Without any type of official tubing bender, the most difficult part was bending the chromoly tubing. I made a form to bend it over by hand.

It's not easy bending small-diameter quality tubing without crushing it. I had to buy several different wall thicknesses and ruin some tubing before I figured out what worked. I also built several different bending jigs and tried a couple of tubing bender tools before I made something that worked.

I would like to have seen how they did it at the Herse shop. There are some wonderful photos of the shop during the period my bicycle was built and also of Jean Desbois who made my frame in Jan Heine's new and outstanding book on René Herse.

Too bad they weren't making decaleurs while those photos were being taken!

I tried several ways to make the U-shaped finishing front upright piece that you put into it to seal the open ends for riding without the handlebar bag (the other half of the decaleur is bolted to the handlebar bag - see photo links above).

Ready for cleaning


I finally found an easy way to do it and you might be able to figure it out if you look at the finished decaleur photo closely. Hint: there's something slightly different about that piece.

Keep in mind that it won't be in the decaleur most of the time because the bag will remain on the bike mostly. So it's only for sometime and temporary use and I didn't feel it had to be perfect because of that, though I still wanted it to look almost perfect.

Those pieces that appear silver/gray in my photos above are just aluminum holders that aligned and kept the tubing in position for brazing. The two curved pieces had to be kept in position or else they had a tendency to twist.

The other challenge was getting the ends to line up with each other perfectly. Luckily I had purchased the Compass Bicycle decauleur so I had the key piece that attaches to the handlebar bag with bolts and lets you slip the bag into the decaleur in seconds to mount and remove the bag.

Sanded and ready for chrome
Since that part fits tightly into the two open ends, it was the other essential that held the loops aligned for brazing. The aluminum alignment pieces have been removed in the photos below.

Scroll down past the text and you'll see how my decaleur looks ready to be mounted on my René Herse. The chrome plater did quite a nice job and amazingly turned it around in only 4 days!

Hope all your projects are going great, too,
Jim

Ready for installation and use!
How it goes on

Thursday, February 6, 2014

BIKE BOOK REVIEW: Park Tool Big Blue Book of Bicycle Repair, Edition 3

Readers, since it's winter - typically when bicycles need more maintenance - here's a rerun of a recent Jim's Tech Talk column I wrote for RoadBikeRider all about a helpful new guide to bike repair.

As bicycles get more sophisticated, what with advances in carbon frames and components, electronic drivetrains and hydraulic-disc brakes for the road, not to mention the myriad of new bottom bracket and headset configurations - it’s pays to keep on hand an excellent up-to-date bicycle repair manual.

Enter, Park Tool's 3rd Edition Big Blue Book of Bicycle Repair by Calvin Jones ($24.95; available in bicycle shops, bookstores and online/the link above).

While there are lots of things to like about this 241-page softcover book packed with color photos, among my favorite features is that it’s for all bicycles. So, this one book tells you what you need to know to fix all the bikes in your stable from your favorite road bike(s) to your kids’ cruisers or mountain bikes, to your spouse’s everyday get-around machine.

Both older bikes and modern ones are covered, too. And, there’s even a section on internally geared hubs, which are found on many city bikes - a type of road bike growing in popularity as our commutes get more traffic choked and frustrating.

Also, because this book comes from one of the world’s leading, oldest and most innovative bicycle tool manufacturers, the step-by-step procedures and tips and tricks are explained with detail about using tools, too. And, because Park has extensive bike repair help on their website where all their tools are explained, the book refers you to their excellent online sections for even more information.

Trivia: Park Tool’s roots go back to 1956 and a small fix-it shop in St. Paul, Minnesota called Hazel Park Radio and Bicycle. When they became a tool company, they dropped the rest and simply went with Park Tool Company.

I think you’ll also like the clear and simple directions. Some repair manuals are over complicated, which can lead to confusion or simply being afraid to tackle something well within your ability but that appears overly difficult because there’s simply too much information to digest.

Park’s step by steps and procedures - even on high-tech, newer adjustments like setting up Campagnolo EPS and Shimano Di2 electric shifting, or fine-tuning those hydraulic discs I mentioned - are short and sweet and to the point. And when more information is helpful, Jones points you in the right direction.

Tip: Keep in mind that besides this bike repair book and others you might own, there’s an increasing wealth of information on component makers’ and some manufacturers’ websites. There has to be because the companies are producing new designs so quickly that the paper and ink publishing world just can’t keep up. So you’ll want to supplement any repair book’s recommendations with what you find out online.

But there’s plenty in this book to keep your wrenching going smoothly, from charts of recommended torque settings (all-important with carbon bicycles/parts), headset standards, tool lists for setting up your home and on-the-road workshops, a nice glossary so you get your terminology correct talking to your mechanic at the shop and even a fun section all about dealing with breakdowns on the road and trail. I’m sure you’ll be very happy you have a copy in your home shop.

From Park’s website, here are a few more details: 17 chapters; extensive table of contents for easily finding what you need; through-axle systems; tubeless-tire conversion systems; SRAM XX1 11-speed freehub removal/installation; Campagnolo Power Torque cranksets; Specialized S-Works cranksets; BB30 crankset system; PF30 bottom-bracket system; BB86 and BB92 bottom brackets; 11-speed chains/ 11-speed Campagnolo chain installation; 11-speed derailleurs; Shimano Di2 electronic shifting; Campagnolo EPS electronic shifting; Shimano 9000 derailleur adjustments; Shimano and SRAM clutch-type rear derailleurs; SRAM Red derailleur adjustments; Tektro hydraulic brakes; headset standards and SHIS standards, and more.

Tip: For more tool and bike repair tips, check out Calvin’s Corner where Park Tools’ Calvin Jones, the author of the Big Blue Book, offers tales and insights from his work at Park and as a professional USA Cycling mechanic and instructor for USA Cycling’s mechanics' program and Park Tool’s shop-mechanic training program, too.

To successful and enjoyable bicycle repairs,
Jim