Wednesday, November 24, 2010

Video of Bicycle-Friendly Utrecht Netherlands

Take a relaxing break as we enter the busy holiday season with this refreshing almost bicycle-only morning "rush-hour" scene in the Netherlands. It's a long video at 10 minutes, but even if you only watch for 30 seconds I think you'll enjoy the calm and quiet that is pedal-powered traffic.

Watching it I assumed this intersection was always this way and was amazed when I clicked the link at the top and viewed part 2 where the author gives the history of this intersection in Utrecht and how the Dutch had to reclaim the land and make massive changes - even digging out a filled-in riverbed - to restore this city center to what it is today.

It gives me hope that we can keep making changes to our cities that result in more of them offering something like this someday. I would love to see our downtown Santa Cruz, where it's relatively flat and some bike paths already exist, become more bike/ped friendly with reduced and controlled cars and trucks and priority given to people rather than vehicles. Significantly reducing speed limits, downsizing car lane widths to create more bicycle space on the shoulder, not inconveniencing bikes/peds at lights with long delays, and making Pacific Avenue car-free would be a great start.

Have a happy Thanksgiving,
Jim
Here's a link to the video in case it doesn't display for you: http://www.youtube.com/watch?v=8nfOPcwObls

Saturday, November 20, 2010

Cycling Vacation Suggestion

It's never too early to start planning your vacation, everyone. This scenic video of Adventure Cycling's Rocky Mountain Great Divide Route has me dreaming of this epic off-road bicycling trip in Montana. I thought you'd enjoy it too.


You can also watch the video here.

Best cycling wishes,
Jim

Friday, November 12, 2010

Santa Cruz Cyclocross: A Look Back

Made in Santa Cruz: Rock Lobster cyclocross bike
For racing cyclists, it's the final season of the year and that means cyclocross! Also called cross or CX, bicycle cyclocross racing originated in Europe as a way for road racers to stay fit throughout the off season.

Here's a little background and kind of a funny story about my cross exploits. Be sure to check my cyclocross page on my website for a lot more about old-school Santa Cruz cross.

The challenge for racers in the winter was keeping in shape with high-intensity workouts while staying warm. So the idea was conceived to race on slightly modified road bikes around a mostly grass or dirt track on about a one-mile circuit course. On cyclocross bikes, the frames have additional clearance plus knobby road tires and powerful cantilever brakes are used - soon disc brakes. When I raced, cross frames were mostly steel and the components were aluminum. Today, the bikes are aluminum or carbon and the components get lighter and lighter, including carbon wheelsets and components. Lightness is good because you have to carry your bike.

To slow the riders and ensure they won't freeze, the courses have obstacles and often mud stretches to force racers to dismount, shoulder their bicycles and run for a stretch. How well you can handle your bike on sketchy terrain and how seamlessly you can go from saddle to dirt and back again often determines how well you do in the races.

Fortunately, races only last for from roughly 45 minutes to an hour plus a lap, however, it's one of the most intense hours you've probably spent on two wheels and no one will tell you cyclocross racing is a cake walk. But, it sure is fun and a fantastic way to stay in shape all season long.

My involvement in cross started here in Santa Cruz in the early 1980's because we had a great cyclocross series here (and still do). In high school I was a fair cross-country runner and I had always loved cycling. I figured the combination of cycling and running would be perfect for me.

From 1982 to 1984 I made every race. I rode a custom Oxford cross bike (Jim Oxford was a framebuilder in Bonny Doon), based on the geometry of Tom Cuthbertson's Hetchins cross rig that he purchased in England in the 1970's. At that time Tom helped bring the sport of cyclocross to Santa Cruz. He's best known as the author of Anybody's Bike Book, the first massive best selling bicycle repair book. Tom worked at the Bicycle Center on Mission Street (now known as Sprockets), and went on to write great owner's manuals for Apple computer users.

By the time of the 1984 NorCal District Championships and National Championships, which were held less than a mile from my house, on the University of California at Santa Cruz campus, I was competitive - not the highest level, but close. At the Districts, which were held in Tilden Park in Berkeley, the venue for the first National Championships back in 75, I finished 7th and ahead of two former national champs. But, the Nationals on my hometown course had a surprise in store for me.

Besides being part cyclist, part runner, the other thing that suited me about cyclocross was the mechanical aspect. Cross is really tough on bikes and if you're not keeping up with mechanical issues, you'll breakdown and have to switch bikes or wheels during the race, which can ruin your chances of a top finish. While I witnessed broken seatposts and handlebars, endless flat tires, crunched wheels and bent forks at the races, in my three seasons of cross I didn't have so much as a flat tire.

Nationals: L-R: Steve Tilford, Laurence Malone, Roy Knickman
And, then came the Nationals, the biggest stage of my cycling life until then. Because I had finished top 10 in one of the toughest Districts races in the country, I was allowed to stand in the front row at the start. To my left was 5-time National Champ Laurence Malone. To my right was Roy Knickman, just a famous name to me.

I had raced with Laurence many times and even wrenched on his race bike. He was one of the first guys to give me racing, training and equipment advice. He told me to ride a harder gear than on the road so that I could take my weight off the saddle and float over the bumps. He taught me how to dismount to hit the ground in full stride. He helped me, sure, but, I never kept up with him in the races. And standing between him and Roy, I was so nervous and excited that I thought I would explode if they wouldn't hurry up and start the race.
Dan Nall, Dave McLaughlin, Greg Foy and me - somewhere way back

The start was at the base of UCSC, at the top of Bay Street. If you've been there, you know there's a plush lawn to the right. We started there, turned right, blasted up the road and then veered left onto the grass track around the campus course.

The worse obstacle was a log pile seemingly going up into the sky that we had to run up each lap. But I knew the course well and was ready to fly up the opening hill and stick with Laurence and Roy for as long as I could.

In my dreams. They started us and I hit the gas as hard as I ever have and snapped my right pedal clean off! Unbelievable. I only had one choice: shoulder my broken bike and run a half lap to the pits to retrieve my back-up from my mechanic Scott Terriberry. Somehow, I managed to get there, leaped onto my second bike - an old junker 10-speed I'd modified - all my money in my now-crippled custom cross machine. It was at least rideable and I was able to start racing. It took Scott 3 laps to borrow a pedal off a spectator's bike to get me back on my Oxford.

But I was far behind the leaders and in danger of being pulled. Every lap, I could hear the officials yanking riders just a little ways behind me and I battled to keep passing and moving up. My ugly start and the tough course helped me. As I got rolling, some of the guys in front started to tire and I moved further up in the field. In the end I finished 16th and only 25 guys finished the race. Steve Tilford won in dominating fashion lapping almost everyone in the race at least once. He's still racing and winning.

To keep the memories of those classic cross races back in the day alive, I've put a page about them up on my website with more photos and commentary. It was a different type of cross racing back then - more mud, more obstacles, lower-tech bicycles - but it was just as much fun as it is today. One of the biggest differences is that there are now cross racing series across the country and American riders are even successfully competing against the stars of cross in Europe. That's fantastic.

Have a great ride,
Jim

Friday, November 5, 2010

More Lights: Early Bicycle Lamps

To enlighten you a bit more, here are a few cool vintage bicycle light items from the early days. It's fun to think that even in the 1890's - years before automobiles were being mass produced, we wanted to ride at night and see and be seen. And, the vintage lights that illuminated the way via an elegant orange beam created by a burning wick, were as magnificent as the lovely bicycles that carried them.

Behold the 20th Century 1898 Model (note that they call it a "Driving Lamp," cyclists being the first drivers).
Next is the same model, but here they show an alluring nighttime riding scene depicting the powerful Model 1898, "splendid in its improvements," allowing the cyclist to make good use of the half of his cycling time that's dark.
These vintage lights were built to last and they're not that hard to find and quite collectible. Here's a Union Lamp Company William's Globe made around 1897 courtesy of Transport Collectors Auctions. The vents on the top let the heat escape, while the jewel-like glass reflectors provide some side visibility. For fast and easy on/off, the lights' sprung mounts slid over a simple bracket found on the front of most bicycles at the time. The lens is a heavy piece of glass and it's also the door opened to light the wick.

From the same auction site, here's a bedazzling Bridgeport Brass Search Light ornately decorated to be as delightful during daylight as it was brilliant in the moonlight.

And, to demonstrate that the genuine item is as splendid as the bicycle ad for it, here's the illustration for the light shown in the photo above:
Hope you enjoy these treasures from days gone by, and have fun on your nighttime rides!


Wednesday, November 3, 2010

It's Time: Lighten Up Your Bicycle!

1930's Colba light bicycle ad
Not that kind of lighten up your bicycle... I'm talking about lighten up, as in adding lights to your bike to be seen and stay safe now that the time's about to change and it's going to be dark earlier for a lot of us.

It's important because, unless you ride only on brightly lit city streets, you can be just about invisible to drivers if you're bicycling at night without lights. We're so narrow and small that they have a difficult time seeing us even when it's light out.

At night, if they're passing us from behind and we aren't using lights, they won't see us until the very last second - if we're lucky. And, they'll also pull out in front of us or turn across our path for the same reason. Both highly dangerous.

 If you ever get stuck biking home in the dark without lights remember that you can't be seen and do whatever you have to to stay safe. For example, riding on the sidewalk, if that's your only option and no one's using it. Cheap flashlights purchased at a convenience store and duct taped to your handlebars and seatpost will work in a pinch and be handy at home too.

Fortunately, with advances in bulb and battery technology, bike lights have improved in leaps and bounds since the cool Colba light in the ad here was state of the art. So there's no good reason not to equip your two-wheeler with lights. Any bicycle shop will have bright, easy-to-install headlight and taillight setups to keep you safe. In fact, most department stores carry them, too, though you won't get the guarantees, spare parts availability and installation help if you need it.

Planet Bike's Superflash taillight and Blaze headlight is a nice example I have on one of my bikes. Using bright and super long-lasting LEDs (light emitting diodes), standard batteries and easy mounting clips, these lights go on and off in a blink (so they won't get stolen if you lock your bike downtown) and are bright enough to be seen and see. (I especially like that the taillight comes with mounting clips for the seatpost and seatstay so you can always find a spot to install it.)

But there are loads of light makers and an endless variety of bicycle lighting systems at all price points, so shop around, ask friends you ride with what they use, but light your bike up soon so you can safely ride right through the season.

See you on the road,

Jim

Friday, October 29, 2010

The Skeleton Peloton Wishes All A Happy Halloween!

Fellow pedalers, from deep within my dusty, spiderweb-shrouded bicycle archive of relics, here are some spooky skeleton cyclists dying to wish you a happy and haunted Halloween.

Talk about low body fat, strength-to-weight ratio and the courage to bury yourself - this doomed peloton powers down the road - unaffected by the wind whistling through their bones, floats ghost-like over the steepest climbs and bombs the descents with death-defying speed.

The 1904 Dawis rider on the left, "Skully," is the team fastman. With his razor-sharp elbows and massive rib cage there's no beating him across the finish line.

And, though "Grinning Boy" on his permanent podium, appropriately painted yellow, appears stuck in cement, his workman beginnings in Oaxaca, Mexico sculpted him into a top domestique up to the toughest tests. His springy legs can close any gap, he can drive the pace at the front relentlessly and is also perfectly delighted to tote bottles all stage long.

Then, we come to our merry band of pranksters, The Politicians drawn by satirist Jose Guadelupe Posada in 1890. Sure to strike terror in the heart of any competitor, this ghoulish gang is ready to dominate with trick aero helmets, cutting-edge framesets and wheels and even wings!  Have a great Halloween everyone!

Wednesday, October 27, 2010

Q&A: More noisy bicycles, checking cassette wear, too clean

Happy Halloween everyone! In this season of ghostly apparitions and things going bump in the night, here are a few Q and A's on chasing away bicycle gremlins. And, remember to save any Snickers bars you get while trick or treatin' - great ride food!

Q: Hi Jim,
Bike noises can be such puzzlers, so I was happy to find your webpage on them. I could relate to many of the noises. Here's one that had me stumped (still does, insofar as the exact mechanism goes).

I have a Gary Fisher HiFi-Plus mountain bike. I ride a lot and stay on top of general cleanup, as Boise's summer trails are dusty. After a couple of years, it developed a slight "click" or "tick" on most crank revolutions. Came from the bottom bracket/crank area. You could hear it but not feel it. I kept riding. With time, the single click grew to a couple of clicks - again, fairly regular with revolutions. With more time, these clicks merged into a close-spaced series that I would call a "c-r-r-r-reak". Almost the sound of something flexing. Usually took 10-15 minutes of riding to really develop. Of course, such stuff resonates through the whole frame and is annoying no end.

As this developed over a month's time, I suspected and tried everything - pedals, cranks, chainrings, chain, bearing bracket, frame cracks, etc. Check, tighten, clean, lube. Nothing helped. Other mechanic friends suggested everything I had already tried. Having admitted defeat, I dropped by the shop I bought the bike from, recounted the history, told them I wasn't going to give them the bike to puzzle over (I was going to fix this myself!), but had they ever run into this on this bike?

Almost without hesitation, the mechanic told me to to just disassemble the bottom bracket, clean it up, and put it back together. I protested, saying that I knew it was in/torqued to specs, etc. He said, "Trust me." I did.

Complete tear-down, wipe-down, lube and reassemble. Voila - no creak. Not for 2 years now. My explanation: somehow fine grit or something works its way into those fine threads, or the metal-to-metal/metal-to-plastic contact of bearing/bracket parts (or something) gets to where parts move against each other ever so slightly, generating the sound in the flexing or twisting.  What do you think?

Eric

Teflon tape can silence BB clicks and ticks
A: I’m glad your mechanic was able to give you such a sure fix, Eric. In a lot of cases I’ve seen, it is the BB – not always – but so frequently, that it never hurts to take out and reinstall the BB. On most cranksets these days it’s relatively simple to do this if you have a few basic tools, like Park Tool's BBT-9 cup tool for Shimano BBs. It used to be a much bigger job to do it right, but then BBs didn’t used to make noise so often either. Maybe it’s a trade off we all have to make to enjoy cartridge bearing, oversize, external cup BBs?

The bike I ride the most is a Litespeed Vortex road bike. It has an aluminum BB in a titanium frame. This combination tends to eventually creak, click, etc. A trick that works is wrapping plumber's Teflon tape around the BB cup threads during installation. This adds a layer of plastic in there and seems to give you several years before any noise returns. In fact, Jeff Pierce, the 3rd American to win a Tour de France stage (on his Litespeed Vortex), told me the mechanics used plumber's tape on the team bikes.

And, I think you’re right, that the parts in the BB are slightly loosening and that dirt/grit is getting in there and causing the noise. You might experiment with plumbers tape or a thicker lube, maybe an anti seize, or a Locktite even, to see if you could get a longer lasting seal that prevents the noise almost permanently.

It’s fun figuring this stuff out – if the noise doesn’t drive you crazy first!
Jim

----------------------------------------------------
Q: Hi Jim,
I saw that you ride a Cervelo Soloist just like me, so I thought you'd be a good person to ask. This seems like it should be a simple question but... I've been asking around about how to tell if a 12-25 cassette should be replaced?

I need to replace my chain. If I don't replace the cassette at the same time, and it's bad, I run the risk of ruining the chain prematurely. If I replace the cassette and it's not bad, I'm just throwing out a good cassette (which happens to be a Shimano Ultegra model).

So, if I can know the signs of a bad cassette, I'm golden. Problem is, every bike shop I talk with tells me there is no way to really tell, and that I'm better off replacing the cassette. That's OK if you have deep pockets. I thought of comparing a new cassette directly with the old one, but is this really the only way?

Any suggestions you offer up will be greatly appreciated,

Bruce

A: What the shops are telling you is pretty accurate, Bruce, but there actually is a cassette-cog checking tool made by the German chain/hub company Rohloff, but I’ve never had a chance to try it – or even seen it anywhere. You can learn more about its use on their pdf instructions page and check out the illustration on the right. Here’s the page on it on their site.

It might be an interesting and helpful tool. I’m not sure having never used it, but I'll try to purchase one and give it a try.

Unfortunately, you can’t know if a cassette is worn out without checking it somehow. The changes to the cogs over time are so slight that you can't see the wear the way you can with the chainrings, which are made of aluminum and change shape more distinctly. But, it’s foolish to pay for a new cassette if your old one isn’t worn out. Also, unless it’s truly worn out, a cassette won’t hurt the new chain.

The standard way to check for cassette cog wear is to install the new chain (when the old one needs replacing), and then go for a test ride. While riding, you shift onto each cog, one at a time. On each cog, you stand up and push hard to feel if the chain runs smoothly and more importantly if it skips. Skipping makes a loud popping noise and you’ll almost crash if you’re not careful as the chain actually rides up and off the cog and skips forward. If you experience this, you know that the cog(s) that skip are worn out and the cassette needs to be replaced.

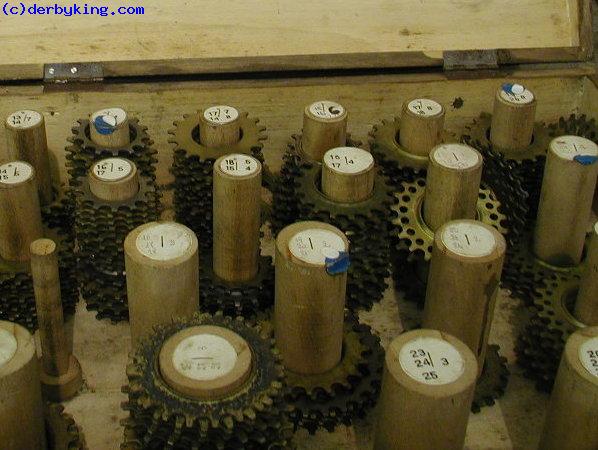
In the days of freewheels we could replace one cog at a time. Typically, you’d replace only the cogs that skipped and they’d usually be the smallest cogs. So, you’d put on a new 12 and 13 and the cassette would be good to go. Here's a photo of a classic Regina freewheel cog case that we used to use to build and repair Regina freewheels in the 70's and 80's.

With the advent of cassettes, though, you now have to buy the whole thing, which is a shame because you never wear out all the cogs at the same rate so you’re paying for everything when you only probably need one new cog.

You can keep a cassette lasting longer by changing the chain more frequently, but you end up paying for the chains, so you have to do the math for yourself and decide what makes the most sense. If you prefer expensive chains, you probably want to get your money's worth out of them.

Most of us just ride the chain until it’s showing signs of wear and then we replace it. Usually the cassette won’t be worn out yet. But, after you’ve replaced 2 chains, you may need a new cassette. It depends a lot of how and where you ride. So, if you’re in the rain and climbing hills all the time, you will wear things out faster than a flatlander in dry conditions.

If you decide to buy the Rohloff tool, I’d enjoy hearing how you like it and if it’s useful. I didn’t study the instructions sheet, but maybe you could even make your own version somehow as a do-it-yourself project? Though it may be easier to just test ride your bike with the new chain to see if the cassette is worn out yet.
Jim

----------------------------------------------------
Q: Hello from Bucharest, Romania, Jim!

I found you by searching on Internet about bicycle noises, read it with great interest. Thank you for posting that info!

I just want to tell you about a strange noise which comes from my bike and drives me nuts. Maybe you met that before and I would be happy if sharing some info.

Shortly, while riding in sitting position with every pedal revolution I hear a noise coming from the upper tube of the frame. Sounds like metal crack. And the weird thing: when I loosened and then tightened the seat binder bolt the noise disappears for a while (let's say like 10-15 km of riding) and then reappears.

I already spray lubed it, installed it back, and it did nothing. The noise also appears if staying only in sitting position and moving back and forth without pedaling, but when I lean forward my upper body it starts to disappears. It seems to me like a sort of tension is creating over time between seat post and frame.

I'll let you know in case I found a solution and maybe you'll find it useful to put it on your website.
I'll be glad to help out other cyclists.

In case you have any suggestion please let me know, I would highly appreciate!

Regards,
Lucian

A: Nice to hear from you, Lucian, but sorry to hear about the noise on your Scott Scale 50 bicycle. Have you tried using a semi-permanent grease on the surface of the seatpost, inside the clamp around the frame and on the bolt too? There’s something called anti-seize. It’s a kind of lubricant designed to not evaporate or wear off. The kind I have is silver. If you get it on your hands, it’s hard to get off because it’s sticks so well.

If you can find this stuff, and apply it to those parts, it might make the noise go away forever. I would also take the time to disassemble the seat clamp at the top of the seatpost – the part that clamps the seat. Then lube those parts and put it back together. That’s an area where these noises come from too, and if the seatpost was not lubed already, they may have forgotten to lube the seatpost clamp/seat interface too.

These steps should quiet your bicycle!
Jim

----------------------------------------------------
Q: Hello Jim,

Shimano Nexus Inter 7 Roller Brake Hub 36H 7 Speed SilverHere I am again with a problem facing to. I took apart my Shimano Nexus internal-gear hub, because it started to have some sandy noise from it (suspected that some dirt penetrated under the sealing). Took off the whole gear set from the hub as one, washed in petrol, put some grease on it and installed back.

Even though it seems everything in the right place, in gears 3-7 and when using the pedal brake, it has an awful cracking noise. Any hints what did I do wrong? I used white vaseline from the pharmacy as grease, can it be the mistake?

Thanks,
Béla

A: Hi Béla,
I suspect that when you washed it with petrol you removed all the lubrication. Petrol is too harsh for cleaning bicycle parts like hub gears. It's so powerful it cuts through and ruins any lubricants inside and you end up with a part that's dry and no longer lubricated. This puts metal parts that touch each other and need to mesh correctly in jeopardy because they are now running metal on metal with no film of lube between them.

Lubing it with Vaseline wouldn't likely solve the problem. The petrol gets inside the parts and washes out all the lube. The Vaseline - even if you spread it and push it - will have a hard time getting between parts and lubricating them adequately.

What I would try is taking it apart again and lubricating it with a thick oil, like automobile motor oil. You need to get this inside the parts. Be sure not to get it on any parts in the brake that are required to provide friction for stopping. But, get it inside the moving parts that mesh for shifting/gearing. One approach would be to soak the parts in an oil bath for a while so the oil really penetrates. Then, you'd want to let it drain out and wipe the outside of the part clean. Oil will leak out in use later, but you can use a rag to wipe it off. And, you know the part is lubed inside.

In the future for cleaning you can use a thin oil. This will wash out dirt while keeping the lube intact inside the parts. You never want to remove all the lube because it's hard to get it back in there. That's why it's a problem to clean parts with petrol or engine-cleaner solvents.

You should us a good bicycle grease on any hub bearings. Vaseline is too thin to last long enough.

I hope this helps get the hub running nicely again,
Jim